February 10, 2009

Run a parameter query within an Access form

  • Date: October 3rd, 2008
  • Author: Mary Ann Richardson

When your users need to run a parameter query while they’re working in a form, this custom button will save them some time.


Users can enter criteria directly into a parameter query’s dialog box, but there may be times when they’ll need to run a parameter query while working in a form. You can add a button to the form that will run a query using criteria entered in a form field. For example, say your company services customers in two states, Missouri and Illinois. You would like to create a query that will allow service personnel working in either state to quickly get a list of their customer data. Follow these steps:

  1. Open the form in Design View.
  2. Click on the Text Box tool and then click and drag to locate the control in your form.
  3. Right-click the text box and select Properties.
  4. Click in the Name property box and enter txtEnterState.
  5. Click in the Caption property box and type Enter MO or IL.
  6. Click on the Command Button tool and click and drag to locate the button in your form (Figure A).

Figure A

  1. Close and save your form. (In this example, we saved the form as qryFormQueryState.)
  2. Click on the Query object in the Database window and click New. (In Access 2007, click the Create tab and then click Query Design in the Other group.)
  3. Add all the fields you want to your query.
  4. Right-click the Criteria cell under the State field and select Build.
  5. Enter the following code at the prompt, as shown in Figure B:
    [Forms]![frmQueryState].[txtEnterState]

Figure B

  1. Click OK.
  2. Close and save the query. (In this example, we saved the query as Customer Query by State.)
  3. Open the form in Design view.
  4. Click the Command Button control and then click and drag to locate the control in your form.
  5. In the Command Button Wizard, click Miscellaneous in the Categories box, and then click Run Query (Figure C).

Figure cialis fast delivery C

  1. Click Next. Select Customer Query by State, and then click Next again.
  2. Click in the text box and type Run Customer Query by State, as shown in Figure D.

Figure D

  1. Click Next and then click Finish.

Now when service representatives want a customer list, they simply enter the appropriate state and click the Run Customer Query by State button (Figure E).

Figure E

Permalink • Print • Comment

Three handy ways to customize Outlook

  • Date: October 2nd, 2008
  • Author: Susan Harkins

Tweak your Outlook menus and toolbars so that it’s easy to access just the tools you need.


#1: Rearrange existing commands

Most of us use a few commands a lot, and seldom, if ever, use the rest. You can rearrange the commands on a menu or toolbar, making selection a bit more efficient. To do so, choose Tools | Customize, click the Commands tab, and click Rearrange Commands. In the Rearrange Commands dialog box (Figure A), select either the Menu Bar or Toolbar option. Then, choose the appropriate menu or toolbar from the drop-down list at the top of the dialog box. The Controls list box will display the commands, including submenus, as they appear from top to bottom on the menu (or left to right on the selected toolbar).

Figure A

customize outlook

You can add, delete, or move a command up or down (or left and right). Clicking Add will position the new item above or to the left of the selected command. You can also modify the selection by changing its caption and other attributes. Select Begin A Group if you want to add a separator above or beside the selected command. Clicking Reset removes all the customization, in case you need to start over.

#2: Move commands the easy way

You don’t have to use the Customize dialog box to move commands on a toolbar. Hold down the Alt key, click on a button, and drag it to an alternate position or off the toolbar completely. To restore the tool, reset the toolbar or use the Customize dialog box to put it back.

If you remove a custom command, you’ll have to rebuild it if you ever need it again. Consider moving custom commands to a custom toolbar created for the purpose of storing custom commands you think you no longer need. Someday, you may want that command and you can simply restore it from the custom toolbar instead of rebuilding it.

#3: Create custom toolbars

To create a custom toolbar, choose Customize | Tools. Everything you need is right there in the Customize dialog box. Click the Toolbars tab and then click New. In cialis erectile dysfunction the New Toolbar dialog box (Figure B), enter a name and click OK. Outlook will create a new, empty toolbar. Just switch to the Commands tab to add built-in commands to the new toolbar by dragging them from the Commands list.

Figure B

new toolbar

Permalink • Print • Comment

Easy tricks to make your Access forms run faster

  • Date: October 2nd, 2008
  • Author: Mary Ann Richardson

By giving a form less data to digest, you can make it run more efficiently. These two tips can help.


The less data Access has to load into memory when you open a form, the better the performance. For example, if a form will be used solely for entering data rather than for data searches, you should change the form’s data entry property so a blank record opens directly. Otherwise, Access will read in all the records in the file before it displays the blank record at the end of the record set. Follow these steps to change the form’s data entry property:


  1. Open the form in Design View and click the Selector button.
  2. In the form’s property sheet, click the Data tab.
  3. Click in the DataEntry property text box and select Yes.

Another way you can improve performance is to use only default formatting cialis en francais and properties for most or all of the form controls. Your form will load faster because Access does not have to load the non-default form and control properties. If you must change the defaults for most of the controls in your form, create one control with the desired properties and make that the default control. To do so, follow these steps:

  1. Add a control to your form and change its defaults according to your form’s requirements.
  2. With the control selected, go to Format | Set Control Defaults.

Now, when you add the control to your form, it will have the same properties as the first one. Access saves only the properties of the default control; it does not need to store each control’s individual properties.

Permalink • Print • Comment

How to make your website really, really fast

February 9th, 2009

Posted by Andrew Mager

Steve Souders knows how to make a website speed through a web browser.

cialis ejaculation href=”http://www.flickr.com/photos/mager/3267072847/” title=”Steve Souders from Google by magerleagues, on Flickr”>Steve Souders from Google

And he works at Google, one of the fastest websites around.

Web performace is a two-pronged beast: efficiency and response time. Efficiency deals with the scalability challenges of building a top 100 global website. You have millions of users and billions of page views, and it’s awe-inspiring to understand the full scope of the backend architecture of something that large.

The set of directions that the HTML document gives to every process really determines the speed of the page.

On iGoogle for example, only 17% of the page is backend, non-cached data and needs to be requested each time. The rest is front-end processing.

80-90% of the end-user response time is spent on the front-end. Start there when you want to figure out how you can make your site faster.

If you can cut this front-end time in half, your users will notice it.
Offer greater potential for improvement and notice simple performance tweaks on the backend too.

14 tips for performance

  1. Make fewer HTTP requests
  2. Use a CDN
  3. Add an Expires header
  4. Gzip components
  5. Put stylesheets at the top
  6. Put scripts at the bottom
  7. Avoid CSS expressions
  8. Make JS and CSS external
  9. Reduce DNS lookups
  10. Minify JS
  11. Avoid redirects
  12. Remove duplicate scripts
  13. Configure ETags
  14. Make AJAX cacheable

YSlow is a Firebug extension that gives developers the chance to analyze every slow part of your website and test it against the 14 points mentioned above.

O’Reilly Velocity is a web performance and operations conference co-founded by Souders and Tim O’Reilly. There should be some really good talks this year.

Souders also taught a class at Stanford called High Performance Websites.

Why focus on Javascript? They have a huge impact on the page load time.
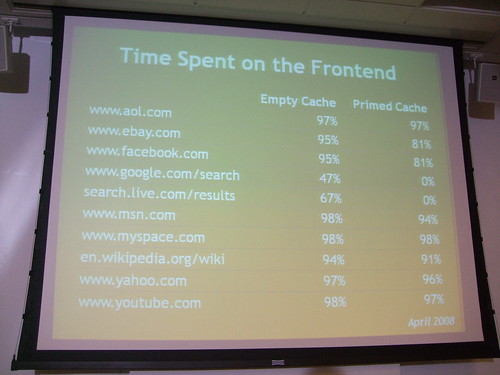
Time spent on the front end

AOL has about 5 scripts accounting for about 60 or 80% load time.

Why focus on Javascript?

Facebook has about a megabyte of Javascript.

Why focus on Javascript?

JS is downloaded sequentially, even if the HTML document has already been downloaded. It won’t draw anything on the screen unless the script is finished downloading.

Cuzillion is a tool that does batch testing on webpages.
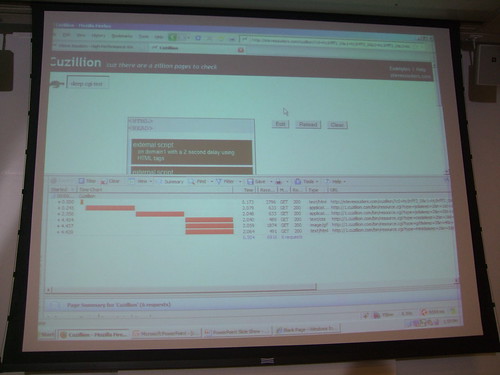
Cuzillion from Steve Souders

HTTPWatch is his preferred packet sniffer.

If you can split the Javascript in what’s needed to render and “everything else”, you will dramatically improve your page load time. Microsoft has a whitepaper that talks about how this can be done automatically with something called Doloto. Look at the source code of MSN.com and see how they do it.

Steve Souders from Google

But even if you can split the initial page load, you will still have external scripts that will have an impact on your page.

There are many ways to make your scripts load all at the same time. XHR evaluation is an option but you are open to XSS attacks and all scripts must have the same domain.

Fast websites by Steve Souders

Putting a script in an iframe causes the JS to be downloaded in parallel with other resources on the page. You can use the DOM method for creating the head element using createElement.

Try the <script defer src="file.html">. This works in IE and FF 3.1, but it’s not the best method. Domains can differ and you don’t have to refactor your code though.

Don’t even use the document.write method. It’s terrible for many reasons.

It’s always good to show busy indicators when the user needs feedback. Lazy-loading code sucks, but the user needs to know that the page isn’t done.

Ask yourself three questions:

  • What’s the URL of the script?
  • Do I want to trigger busy signals?
  • Does this script have to be executed in order or not?

Fast websites by Steve Souders

Sometimes the user is waiting for their inbox to load, and you need the scripts to load in order. Other times it won’t matter.

The best part: none of these techniques are that hard to implement.

Don’t let scripts block other downloads either.

Stylesheets load in parallel, but if you have a stylesheet followed by an inline script, parallel downloads are broken.

Also, use link instead of @import.

Here is a link to Souders’ UA profiler. It’s a chart of all the compatibilities among all browsers regarding fast loading pages. Or as Souders puts it, a “community-driven project for gathering browser performance characteristics”.

He also built something called Hammerhead, which adds a little tab to Firebug that tells you the load time of the page. It also clears the cache in between load times. You can compare websites side by side too.

In HTTP 1.1 you can do transfer encoding in chunks. Your browser can un-gzip even a partial HTML document and start parsing it before the stylesheet is even loaded. CNET.com does this.

IE7 will open two connections per server name, unless the traffic is HTTP 1.0. Optimize images with smush.it

Takeaways

Focus is on the front end. Many front end engineers are learning on the job, kinda teaching themselves. It’s an under-represented but a critical part of the web community.

Everything is going Javascript. It’s the most painful thing to deal with on the page, and we need to identify and adopt some best practices in that space.

Speed matters. If you are waiting, you get bored and frustrated. When Google slowed down 500ms, they lost 20% traffic. Yahoo sped up their search results page only 400ms, and they got 5-10% faster. Amazon ties a 100ms latency to 1% sales loss. A faster page has an impact on revenue and cost savings.

Here is a link to Steve’s presentation »

Souders wrote High Performance Websites in 2007.

Permalink • Print • Comment

Weatherproofing Your Camera

Weather plays a big part in your day when you're out taking pictures. Because of that, it helps if you weatherproof your camera. If you're using a camera that has an extended lens and accepts filter lenses, this tip should definitely help to ensure that weather doesn’t come between you and the scene you're trying to capture!

Tools Required

One plastic bag, one rubber band and an ultraviolet (UV) filter. Note: In the screenshots below, the UV filter is already mounted on the camera lens, which is why you won’t see the lens separately.

Step 1:

Mount the UV filter on your camera’s lens. Once that's done, cut a hole in the plastic bag and smuggle the camera inside it in such a way that the camera lens sticks cialis effectiveness out of the hole. That means, the entire camera is hidden inside the plastic bag, except for the camera lens sticking out.

Step 2:

Wrap a rubber band around the UV filter in such a way that the plastic bag is pinched against it. That's to ensure grip and to prevent the plastic from covering the lens when a picture is being taken.

Step 3:

Your camera is now weatherproofed! All you need to do is practice, practice, practice. After all, unlike before, you now need to put your hand inside the plastic bag and operate the camera. That might take some getting used to, but the trade off is great: your expensive equipment is saved from the rain and snow and you'll come away with some great shots!

And Finally…

Sometimes the wind can be overwhelming. That's particularly true when you're in the great outdoors and shooting landscapes. In such circumstances, you just need another inexpensive rubber band to close the hole in the bag. The rest remains the same. Simply continue to operate the camera through the plastic bag and you'll have all-weather gear that's inexpensive as well.

However, if you have the money, another way to protect your shooting gear is to buy a rain hood for your camera. Or, if you're not ready to invest in a rain hood, you could also try wrapping a towel around your camera to keep the rain or snow away. Either way, I wish you happy shooting!

Permalink • Print • Comment
« Previous PageNext Page »
Made with WordPress and an easy to customize WordPress theme • Sky Gold skin by Denis de Bernardy