December 20, 2010
Autorun.inf, What is it?
The Autorun.inf file and the AutoRun technology
 When you create a CD/DVD menu with SamLogic CD-Menu Creator you have the option to create a file with the name Autorun.inf. This file is very important if you want to create an autorun / autoplay menu (a menu that opens automatically) because it instructs Windows which application that should be launched when the CD or DVD is inserted in the drive.
The Autorun.inf file must always be located in the root directory of the CD/DVD. If you place it in a sub directory Windows will not found it. When you insert the disc Windows will look after Autorun.inf in the root directory and if it find it, it will read the file and interpret the contents of it.
This feature to automatically start programs on compact discs is sometimes referred as the Windows AutoRun technology. All Windows since Windows 95 have this technology built-in. Almost all software that is distributed via CD or DVD uses this technology to automatically open menus or start programs. You can read more about this in the related article: Why Create an Autorun Menu For Your CD or DVD?.
What is inside Autorun.inf?
Autorun.inf is a text file and in its basic form it look like this:
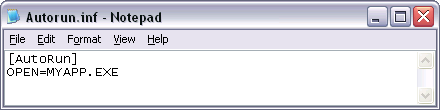
| [AutoRun] OPEN=MYAPP.EXE |
The OPEN command specifies which program that should be run when the CD/DVD is inserted in the drive. In the example above a program with the name MYAPP.EXE will be executed.
When you create an Autorun.inf file you can use Notepad as an editor. The example above should look like this in Notepad:
Autorun.inf can also specify an icon that will represent your application's CD or DVD in the Windows user interface (for example in Windows Explorer). To specify a new icon to the CD/DVD drive, Autorun.inf should contain the following commands:
| [AutoRun] OPEN=MYAPP.EXE ICON=MYICON.ICO |
The ICON command specifies the filename of the new icon to display. In this case an icon with the filename MYICON.ICO will be used.
In the examples above the program file and the icon file most be located in the root directory of the CD/DVD, but you can also access files located in a sub directory on the CD/DVD if you specify a relative path. Example:
| [AutoRun] OPEN=FOLDER\MYAPP.EXE |
The OPEN and ICON commands are the most used in Autorun.inf files, but there are more commands available. You can for example specify a new disc label with the LABEL command. The LABEL command has the benefit that you can specify labels that contains more than 16 characters (16 is the normal limit for CD/DVD labels).
A list and a description of the commands that can be used in Autorun.inf can be found at the following page: Autorun.inf – Commands. If you want a more detailed information about the commands you can also take a look at the following viagra drugs Microsoft page: Autorun.inf Entries.
Is it possible to show documents automatically with Autorun.inf?
Yes, it is possible. There is a command with the name SHELLEXECUTE that can be used to open documents automatically. If you specify a filename after SHELLEXECUTE, for example like this:
| [AutoRun] SHELLEXECUTE=INFO.TXT |
the command will open the document automatically when the CD/DVD is inserted in the drive. In this case a file with the name INFO.TXT will be opened automatically.
The SHELLEXECUTE command can be used to automatically open for example Word, PDF or HTML files, or play movies. But you should be aware of that there must exist a program that can read the document or movie format, otherwise the command will fail. If you use SHELLEXECUTE to open a PDF file, there must be a copy of Adobe Reader installed. Otherwise the PDF can not be opened.
If you want to handle cases where a viewer program might be missing, you can use a general document launcher program instead. For example our program SamLogic Autorun Creator will handle cases where a proper viewer program is missing.
In some computers the AutoRun feature do not seems to work, why?
As mentioned before, all Windows since Windows 95 have the AutoRun technology built-in, but in some computers this feature can be disabled for some drive types. Administrators can disable this feature for CD/DVD drives, and also USB flash drives, in client computers for security reasons. And some applications, for example CD/DVD burning programs, can sometimes also disable this feature.
If AutoRun is turned off for a drive that you want to have AutoRun on you can normally turn it on it by changing a value in the registry in Windows. You can read the following article on our Internet site to get more information:

 One of the greatest frustrations of the computer world is the slow desktop or
 Buy the memory and install it yourself, or pay a shop to install it for you. You can do a Bing search to cross check the part number Kingston.com provides you to find the exact specifications of the type of memory you want to use. Voila! More memory equals better performance!
 drives lying around. Why not put them to good use on your Windows Vista or Windows 7 system by using them as a "
 Even with hardware upgrades like we discussed above, your PC’s performance sinks fast if it is plagued with malware. A lot of the off-the-shelf PC’s will give you a trial program, but I like free things myself. One free suite that recently became available is "Security Essentials" from Microsoft. Unfortunately it isn't bundled with Windows, but it is just a
  (SSD) will help with drive access times, and it is something that an intermediate geek can handle.


