December 21, 2010

Manually Remove Antivirus GT

Antivirus GT is a rogue antispyware program that is distributed to computers through Win32/FakeXPA Trojan virus. Once computer is infected, Antivirus GT completely takes over the system. You start receiving tons of fake pop up messages stating about some malicious files detected that may cause security issues to your system.The parasite starts to scan user’s PC and displays fictitious scan results. They usually state your system is at high security risk and to prevent more damage you supposedly have to download and purchase its registered version. Do not believe any information it spreads because it is a fraud. malware only gains you to buy illegal program. It is not worth spending your money because it neither has an ability to detect nor remove computer threats therefore it is not being trusted.
Turn off your system restore before you begin this process

Manual Antivirus GT removal

Stop these Antivirus GT processes:
antivirus GT.exe
avgt.exe
Disable these Antivirus GT DLL files:
MicrosoftExtensions.dll
Remove these Antivirus GT Registry Entries:
HKEY_CURRENT_USER\Software\EVA246
HKEY_CURRENT_USER\Software\WinFD
HKEY_CLASSES_ROOT\CLSID\{3304F17F-732C-4AC6-BF67-DBDC8B88C11F}
HKEY_LOCAL_MACHINE\SOFTWARE\Microsoft\Windows\CurrentVersion\Explorer\Browser Helper Objects\{3304F17F-732C-4AC6-BF67-DBDC8B88C11F}
HKEY_CURRENT_USER\Software\Microsoft\Windows\CurrentVersion\Run “AVGT”
HKEY_LOCAL_MACHINE\SOFTWARE\Microsoft\Windows\CurrentVersion\Internet Settings\5.0\User Agent\Post Platform “WinNT-EVI 05.07.2010″
Remove these Antivirus GT files:
c:\Documents and Settings\All Users\Start Menu\AVGT\
c:\Documents and Settings\All Users\Start Menu\AVGT\AntivirusGT.lnk
c:\Documents and Settings\All Users\Start Menu\AVGT\Uninstall.lnk
c:\Program Files\AVGT\
c:\Program Files\AVGT\antivirusGT.exe
%UserProfile%\Desktop\AntivirusGT.lnk
C:\Documents and Settings\[User Name]\Local Settings\Temp\MicrosoftExtensions.dll

Download Antivirus GT Removal Tool 1.0

Antivirus GT Removal Tool 1.0Antivirus GT Removal Tool is a small and easy-to-use application designed to delete fake Antivirus GT from your computer. Antivirus GT is a fake antivirus program which intends to make some profit from the user of the infected computer. viagra for sale in ireland It is installed to the computer when the user accidentally used a fake online scanner which will produce fake result.This result will state that the computer is infected and urge you to download and install Antivirus GT. Once installed, it will run automatically when the system boots. However, it does not do what it claims to be. After scanning the computer, it still states that the computer is infected with malware.

Permalink • Print • Comment

December 20, 2010

How To Make Skype a Portable App

by Mark O'Neill on Jan. 20th, 2009

how to make skype portableAs yet, Skype doesn’t offer an official portable USB version of their software (with the exception of the U3 smart drive version) which frustrates a lot of people (including myself). This has led people to make an unofficial hack of a portable version for themselves.

Read on to find out how to make skype portable. It’s extremely easy.

1. The first step is to make the folder on your USB stick where it will all stay. So call it whatever you want. Let’s call it “Portable Skype” for example. But you can give it whatever name you want (it can be ‘skype portable version’ or just skype, doesn’t matter).

2. Now go to the installed Skype app on your computer (normally located at C:\Program Files\Skype) and look for a file called Skype.exe

skype.exe- skype portable version

Right-click and copy that file. Do not move it anywhere. Just right-click and copy.

3. Now go to the “Portable Skype” folder and insert that copied “Skype.exe” file into the “Portable Skype” folder.

4. In the “Portable Skype” folder, make a new sub-folder called data

5. Inside the “data” folder, make a new text document using Notepad or something similar.   Name the file skype.bat

6. Open this file up and insert the following line: skype.exe /datapath:”Data” viagra fast delivery /removable

7. Save and close the file. That’s it. You’re done. You now have a portable version of Skype.

I tested this by moving the whole lot onto a USB stick and then launching it from there. It launched immediately but the firewall asked me if I wanted to let it pass. So you would need to configure the firewall of the computer you would be using the portable Skype on to allow the app through.

There is an interesting thread on PortableApps about what should be put on the skype.bat file. If you want to fine-tune the file, you might want to read the thread.

This is just a “rough and ready” hack to put Skype on your USB stick and how to make skype portable app. Please note, future releases of Skype may cause this hack to stop working. I am hoping that Skype will eventually bring out an official portable version that works for ALL portable USB sticks, not just the U3.

Permalink • Print • Comment

USB Drive AutoRun.inf Tweaking

The autorun.inf file is the key to getting your USB drive (or CD-ROM drive, for that matter) to perform certain actions automatically and customize it’s look in My Computer. The purpose of this article is to shed some light on how this can be done.

Autorun.inf Structure

The autorun.inf file is a simple text file that can be opened up in any text editor (e.g. notepad). It always starts with a section header of:

[autorun]

Below this header is a list of different options. Each of these options is in the following format:

option=value

where

option is the option that you want to set and value is the value that you are setting for that option. So, if you had an option foo and you wanted to be set to bar, then you would enter:

foo=bar

(Do not use foo=bar in your autorun.inf file as it is only an example, not a real option setting.)

That is all there really is to understand about the structure of an autorun.inf file. On to doing some actual cool stuff with it!

Setting a Custom Icon

To create a custom icon for your USB drive, use the icon option. Set it to the name of the icon file.

Note: Since drive letters can change for USB drives, the file path is relative to the root of the drive. This means that if your USB drive is presently mounted on U: and your icon is located at U:\Icons\MyIcon.ico, then you would enter \Icons\MyIcon.ico for the value of this option.

For example, if you had an icon on the root of the USB drive called coffeecup.ico and you wanted this to be the icon that showed up for the USB drive, you would enter:

icon=coffeecup.ico

You are not limited to .ico files. If, for example, you have an executable with a nice icon, you can specify it as the icon file. For example:

icon=DCoTopen.exe

This is valid as long as DCoTopen.exe is available on the root of the USB drive.

Some files have more than one icon embedded in them. If this is the case, you can select which icon to use by specifing the index number after the file name. For example:

icon=iconlib.dll,2

This will use the second icon in the iconlib.dll file.

Naming Your USB Drive

If you would like your USB drive to display a specific name othr than the drive label created when it is formatted, use the label option. For example, if I wanted to call my drive DCoT Drive, I would add this to my autorun.inf file:

label=DCoT Drive

Now, when you look at your USB drive in My Computer, it will say DCoT Drive by the drive letter.

Setting AutoPlay Options

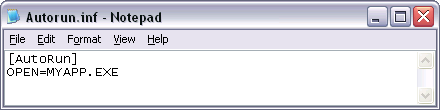
AutoPlay is a relatively new function of Windows XP. It allows you to set up what file is run when the USB drive is plugged into the computer and the message that you are prompted with. There are two options that work in conjunction with AutoPlay. The first is open. It specifies the program that you can run automatically with AutoPlay. So, if we wanted to run a program called DCoTopen.exe, you would add the this to your autorun.inf file:

open=DCoTopen.exe

The second option that we add is the message the user is prompted with. To set this, we use the action option. If we want the message to say DCoT Open Program, add the following to autorun.inf:

action=DCoT Open Program

Once you have added this information, AutoPlay should look something like this:


AutoPlay


Adding Context Menu Items

There are certain basic options such as Open and Explore that are available when you right click on a USB drive. But, wouldn’t it be cool to add your own? You can using a couple of lines in the autorun.inf file.

The first thing that we need to do is create an action, give it a name, and a message. We do all of this using the shell\verb option. For example, let’s say that we would like to create an action called lost. It does not matter what the actin is called. It can be anything you want. We would also like to show the message Help! I’m Lost! in the context menu. We would simply add this line to autorun.inf:

shell\lost=Help! I'm Lost!

This will display Help! I’m Lost! in the context menu so that you can click on it. But, it doesn’t know what to do when you click on it. Tell the system by using shell\verb\command option. In our example, we want to run the Lost.exe application. Adding this line will do the trick:

shell\lost\command=Lost.exe

viagra faq

You can add as many of these line pairs as you want to make the context menu as custom as you want.

Changing Default Action

When you double click on your USB drive, by default it will open up the drive so that you can browse through the files. Often, it is advantageous to perform some other action when the user double clicks the USB drive icon. You do this with the shell option. If we wanted to run the Lost.exe program from the previous section automatically when we double clicked on the USB drive, we would add this line:

shell=lost

because lost is the name of the action that was specified in the earlier lines.

Viewing a File

If you wanted to view a file on your USB drive in the default application instead of running a program on the drive, you can substitute the open option for the shellexecute option. For example, if you wanted to open up a website called, oh, I don’t know, say http://www.DailyCupOfTech.com in the default web browser, you could user the following:

shellexecute=http://www.DailyCupOfTech.com

This will work for any file. This is the equivalent of using Start – Run… and then typing in a file name and clicking OK.

School’s Out, Time To Play!

That is about all there is to customizing the autorun.ing file. Now that you know what you are doing, it’s time to start playing! I have created the Autorun Dabbler’s Toolkit that you can play with.

Download the zip file and extract the contents to the root of an empty USB drive. You can now edit the autorun.inf and get it to do different things. Have fun!

Permalink • Print • Comment

Autorun.inf – Commands

Below are some of the commands/entries in the Autorun.inf file described briefly. A more detailed description can be found at the following Microsoft page: Autorun.inf Entries
 
OPEN =

The OPEN command specifies the path and file name of the application that AutoRun launches when a user inserts a disc in the drive. You can also specify parameters/arguments to the application.
 
ICON =

The ICON command specifies an icon which represents the AutoRun-enabled drive in the Windows user interface. The icon is normally an .ico file, but can also be a .bmp, .exe or .dll file containing icon information. The icon file must be in the same directory as the file specified by the OPEN command.
 
LABEL =

The LABEL command specifies a text label which represents the AutoRun-enabled drive in the Windows user interface. This text label is for example in Windows Explorer showed to the right or below the drive icon.
 
SHELLEXECUTE =

The SHELLEXECUTE command opens a document or starts an application. Mostly used to open documents automatically. Requires Windows ME/2000 or newer.
 
SHELL =

The SHELL command specifies a default command viagra effects on women for the drive's shortcut menu. The shortcut menu of the drive is the menu that is opened when the user right clicks on the drive icon.
 
SHELL\VERB =

The SHELL\VERB command adds a custom command to the drive's shortcut menu. This custom command can for example be used to launch an application on the CD/DVD.
 
ACTION =

ACTION is a command that was introduced with Windows XP SP2. It is not supported in Windows before that. This command specifies a text that should be shown as the first option in the Windows Autoplay dialog, together with the icon specified by the ICON. This option is always selected by default and if the user accepts the option, the application specified by the OPEN or SHELLEXECUTE entry in the media's Autorun.inf file is launched. As an alternative, the SHELLEXECUTE command can also specify a document instead of an application.

Permalink • Print • Comment

Autorun.inf, What is it?

The Autorun.inf file and the AutoRun technology

When you create a CD/DVD menu with SamLogic CD-Menu Creator you have the option to create a file with the name Autorun.inf. This file is very important if you want to create an autorun / autoplay menu (a menu that opens automatically) because it instructs Windows which application that should be launched when the CD or DVD is inserted in the drive.

The Autorun.inf file must always be located in the root directory of the CD/DVD. If you place it in a sub directory Windows will not found it. When you insert the disc Windows will look after Autorun.inf in the root directory and if it find it, it will read the file and interpret the contents of it.

This feature to automatically start programs on compact discs is sometimes referred as the Windows AutoRun technology. All Windows since Windows 95 have this technology built-in. Almost all software that is distributed via CD or DVD uses this technology to automatically open menus or start programs. You can read more about this in the related article: Why Create an Autorun Menu For Your CD or DVD?.


What is inside Autorun.inf?


Autorun.inf is a text file and in its basic form it look like this:
 

[AutoRun]
OPEN=MYAPP.EXE

The OPEN command specifies which program that should be run when the CD/DVD is inserted in the drive. In the example above a program with the name MYAPP.EXE will be executed.
 
When you create an Autorun.inf file you can use Notepad as an editor. The example above should look like this in Notepad:
 
A short Autorun.inf example
 
Autorun.inf can also specify an icon that will represent your application's CD or DVD in the Windows user interface (for example in Windows Explorer). To specify a new icon to the CD/DVD drive, Autorun.inf should contain the following commands:


[AutoRun]
OPEN=MYAPP.EXE

ICON=MYICON.ICO


The ICON command specifies the filename of the new icon to display. In this case an icon with the filename MYICON.ICO will be used.
 
In the examples above the program file and the icon file most be located in the root directory of the CD/DVD, but you can also access files located in a sub directory on the CD/DVD if you specify a relative path. Example:
 

[AutoRun]
OPEN=FOLDER\MYAPP.EXE


The OPEN and ICON commands are the most used in Autorun.inf files, but there are more commands available. You can for example specify a new disc label with the LABEL command. The LABEL command has the benefit that you can specify labels that contains more than 16 characters (16 is the normal limit for CD/DVD labels).
 
A list and a description of the commands that can be used in Autorun.inf can be found at the following page: Autorun.inf – Commands. If you want a more detailed information about the commands you can also take a look at the following viagra drugs Microsoft page: Autorun.inf Entries.


Is it possible to show documents automatically with Autorun.inf?


Yes, it is possible. There is a command with the name SHELLEXECUTE that can be used to open documents automatically. If you specify a filename after SHELLEXECUTE, for example like this:
 

[AutoRun]
SHELLEXECUTE=INFO.TXT


the command will open the document automatically when the CD/DVD is inserted in the drive. In this case a file with the name INFO.TXT will be opened automatically.
 
The SHELLEXECUTE command can be used to automatically open for example Word, PDF or HTML files, or play movies. But you should be aware of that there must exist a program that can read the document or movie format, otherwise the command will fail. If you use SHELLEXECUTE to open a PDF file, there must be a copy of Adobe Reader installed. Otherwise the PDF can not be opened.
 
If you want to handle cases where a viewer program might be missing, you can use a general document launcher program instead. For example our program SamLogic Autorun Creator will handle cases where a proper viewer program is missing.


In some computers the AutoRun feature do not seems to work, why?


As mentioned before, all Windows since Windows 95 have the AutoRun technology built-in, but in some computers this feature can be disabled for some drive types. Administrators can disable this feature for CD/DVD drives, and also USB flash drives, in client computers for security reasons. And some applications, for example CD/DVD burning programs, can sometimes also disable this feature.

If AutoRun is turned off for a drive that you want to have AutoRun on you can normally turn it on it by changing a value in the registry in Windows. You can read the following article on our Internet site to get more information:

Permalink • Print • Comment
Next Page »
Made with WordPress and an easy to customize WordPress theme • Sky Gold skin by Denis de Bernardy