- Go to Control Panel -> Network and Internet -> HomeGroup, and click on Leave the homegroup link to unjoin from any existing home group.


Note: If the home group are shared and hosted from the PC, all HomeGroup connections will be disconnected.
- Click on Leave the homegroup to confirm leaving from the home group.
- Click on Finish when done.
- Go to Control Panel -> System and prescription viagra color=”#0000ff”>Security -> Administrative Tools, and double click on Services. Alternatively, type services.msc in Start Search.
- For each of the following two services:
HomeGroup Listener
HomeGroup ProviderDo the following:
Stop the service, and then double click on the service to open Properties dialog, and set its Startup type to Disabled. Click OK when done.

- The HomeGroup icon and group will no longer be shown in the navigation pane of Windows Explorer in Windows 7, as shown in illustration below.


April 17, 2010
Enable Windows 7’s Hidden “God Mode”
Enable Windows 7's Hidden "God Mode"
 |
By Matthew DeCarlo on January 11, 2010 |
As indicated by enthusiasts around the Web, there is a simple way to access a hidden "God Mode" in Windows 7 and Vista. With a name like that, your expectations might be a little high — and no, Windows is not secretly invincible — but the trick is awesome nevertheless.
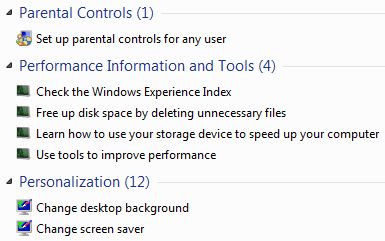
"God Mode" simply provides users with a centralized Control Panel for all of Windows' settings, from changing your desktop background to setting up a VPN or partitioning your hard drive. In all, there are nearly 50 categories and most have several entries.
It's almost comical how simple it is to access it:
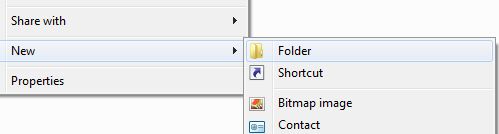
- Create a new folder. Anywhere is fine, I created one on my desktop .
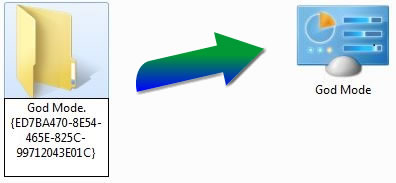
- Rename the folder to: God Mode.{ED7BA470-8E54-465E-825C-99712043E01C} *Note: The "God Mode" chunk can be called anything you want.
- The default folder icon will change to a online viagra canada target=”_top” onclick=”adlinkMouseClick(event,this,3);”>Control Panel icon, and you can open it to view all of the settings.
User reports suggest that it may crash Windows Vista 64-bit , so proceed with caution. For what it's worth, I've successfully used the "feature" on Windows 7 Home Premium and Ultimate 64-bit.
As an additional note, having the undocumented feature disclosed all over the Web, Microsoft has decided to be more open about it admitting similar commands have been available even before Vista. They have also revealed other text strings that create similar "God Mode" folders, a list is available here .
Get the latest Flash Player to see this player.
Change Your Wallpaper on Windows 7 Starter
 |
By Matthew DeCarlo on March 25, 2010 |
Few people would argue that Windows 7 is a great step forward for the platform — but those folks probably don't use the Starter edition. Anyone who is stuck with it will know that this entry-level variant of Microsoft's operating system is swathed in red tape, and is a real bummer to use beyond browsing the Web or checking your email.
Aimed at netbooks and other proprietary systems, it's the most diluted version of Windows 7 with many basic features missing. Among them are the Aero Glass interface, fast user switching, DVD playback, multi-display support, as well as personalization options, such as the ability to change desktop backgrounds, window colors, or sound schemes.
Most of the excluded features won't really hinder the use of a netbook. After all, few ship with DVD drives or have multiple users anyway, but staring at a bright blue Windows logo for the lifespan of your system is torture. Hell, even Windows 3.1 lets you set a desktop background, and thanks to a number of free utilities, so will Windows 7 Starter.
There are many workarounds online, but we recommend the one provided by Oceanis, which you can download here. Extract and run the program, and reboot upon completion. You should see a new image and message on your desktop, giving credence to Oceanis.


Run the utility and click Browse to select a directory of images. Not only will you be able to define one wallpaper, but you can also select several of them for a slideshow, which can be configured to rotate in various intervals, ranging from a minute to a day.
It's worth noting that a new process called "WallPaperAgent.exe" will run at all times, but it only consumes about 900K of system memory (visiting TechSpot via IE consumes over 30,000k for comparison).

If it's an issue, you can end the process and the custom wallpaper seems to remain intact for that session, but the process is launched again after a reboot and if you cripple the executable (C:\Program Files\Oceanis\SystemSetting\WallPaperAgent.exe) the program won't function properly.
Likewise, uninstalling Oceanis' background changer utility will revert your desktop background to the default Windows 7 wallpaper. It's truly a minor "annoyance" all things considered, and most people would happily sacrifice a smidgen of RAM in exchange for a custom wallpaper.
April 16, 2010
7 More Windows 7 Features!
 |
7 More Windows 7 Features!by Ryan Morse – April 4, 2010 |
In Tech Tip 242 we covered some of the biggest new features of Windows 7, but there's still more to be enjoyed with Microsoft's best OS ever. This time, we cover seven more features of Windows 7 so you can take full advantage of the latest and greatest enhancements that are just waiting for you to discover.
|


December 29, 2009
5 Great New Features in Ubuntu 9.10
 |

5 Great New Features in Ubuntu 9.10by: Scott Nesbit – November 22, 2009 |
|
But Karmic Koala also packs some very interesting, and very useful enhancements at the user level. Here Are 5 of the Best… Ubuntu Software CenterWhile it's fairly easy to install software in Ubuntu using a tool called Synaptic Package Manager, you need to do a lot of hunting to try to find what you want to install. The Ubuntu Software Center makes doing that a lot easier, especially for newcomers to the world of Ubuntu. To open the Software Center, click Applications > Ubuntu Software Center. You can find close to 2,200 different pieces of software to install in 12 categories: Accessories, Education, Games, Graphics, Internet, Office, Science, Sound & Video, System Tools, Universal Access, Programming, and Other.
All you need to do is double click one of the categories and then double click an application in the list. You get a brief description of the application and a button labeled Install. When you click Install, you're asked for the root password (required to install software in Linux), and then the Software Center installs the package and any other software on which the application depends. Ubuntu One ClientA previous TechTip briefly looked at Ubuntu One, the online storage service from Canonical (the folks behind Ubuntu). Version 9.10 of the distribution comes with tighter integration with Ubuntu One.
The desktop client is now a standard piece of software on the Ubuntu desktop. You can start it by selecting Applications > Internet > Ubuntu One. All you need to use it is an account with the Web-based Ubuntu One service. It works the same way as older versions of the client, although seems to run more smoothly now. On top of that, if you're using Tomboy (a note taking application) or Evolution (a mail client) then you can sync your notes and contacts.
Updated softwareAt the heart of Ubuntu 9.10 runs version 2.6.31 of the Linux kernel. This is the latest version of the kernel, and offers more generic viagra online security, better startup and shutdown (more on that in a moment), better performance from graphics cards, and improved security. While most of these changes are behind the scenes, they do make for a smoother experience. The main Ubuntu distribution uses the GNOME desktop as its graphical user interface. Ubuntu 9.10 includes version 2.28 of the desktop. There have been a few cosmetic changes to the desktop, as well as changes under the hood. The interface is cleaner and many of the system icons are a lot more compact – in fact, they're almost Mac like. All of the default software that comes with the GNOME desktop has been updated as well. Again, there are some new features (like full-screen editing in the default text editor) and some minor tweaks to the look and feel of the applications. Speaking of look and feel, the desktop notifications are smaller and more compact; they don't get in the way in the same way they did in Ubuntu 9.04. Overall, the GNOME desktop is more stable. There's even enhanced support for Bluetooth keyboards, headsets, and and mice.
Faster booting and shutdownMost Linux distributions start slower than Windows or Mac OS. That's mainly because Linux loads a bunch of drivers and libraries at startup; Windows and Mac OS load them as needed or after startup. Ubuntu's developers have done quite a bit of work to pare down the amount of time it takes for your system to start up. And it shows. On my laptop computer, about 15 seconds has been shaved off the boot time. Your mileage may vary. But it's not only the amount of time required to start up that's been decreased. I, and other Ubuntu users I know, have noticed that our lap and desktop computers shut down much faster. I can't give you an exact number (mainly because I usually walk away from my computer when I shut it down), but I've noticed that it does power down within 10 seconds. Encrypted home directory
This feature was available with a couple of previous versions of Ubuntu. However, to use it you needed to do the deed after an installation was complete. And from the command line, too. You can now apply eCryptfs with a graphical interface during installation. |
 While a good chunk of the tech world was watching the release of Windows 7 recently, there was another release of an operating system that rivaled that of Windows 7; if not for sheer volume then for sheer expectations and excitement. And that was the unveiling of
 Code named


 Your home directory (for example, /home/scott) is your own personal space in the Linux file system. That's where you store your files and whatnot. If you're installing Ubuntu 9.10 and not just upgrading, you can encrypt your home directory (and the home directories of any users you add during installation). This is done by slapping something called eCryptfs (a secure


